# 서비스 실행
cat clusterip-nginx.yaml
apiVersion: v1
kind: Service
metadata:
  name: clusterip-service
spec:
  type: ClusterIP
  clusterIP: 10.100.100.100 #<-- 생략하면 랜덤ip가 됨. None이라고 하면 Headless 서비스가 됨
  selector:
    app: webui
  ports:
  - protocol: TCP
    port: 80
    targetPort: 80

kubectl create -f clusterip-nginx.yaml

kubectl get service
NAME                TYPE        CLUSTER-IP       EXTERNAL-IP   PORT(S)   AGE
clusterip-service   ClusterIP   10.100.100.100   <none>        80/TCP    10s
kubernetes          ClusterIP   10.96.0.1        <none>        443/TCP   7d10h

kubectl describe svc clusterip-service
Name:              clusterip-service
Namespace:         default
Labels:            <none>
Annotations:       <none>
Selector:          app=webui
Type:              ClusterIP
IP Family Policy:  SingleStack
IP Families:       IPv4
IP:                10.100.100.100
IPs:               10.100.100.100
Port:              <unset>  80/TCP
TargetPort:        80/TCP
Endpoints:         10.36.0.1:80,10.44.0.1:80,10.44.0.2:80 #<-- endpoint가 3개 pod의 ip로 분산되어 있는것을 볼 수 있다
Session Affinity:  None
Events:            <none>

#pod 3개중 어디로 연결된 지를 모르지만 결과가 잘 나오는 것을 볼 수 있고
# 각 pod에 접속해서 index.html을 바꿔놓으면 확실히 확인 될 것이다.
curl 10.100.100.100

kubectl delete service clusterip-service
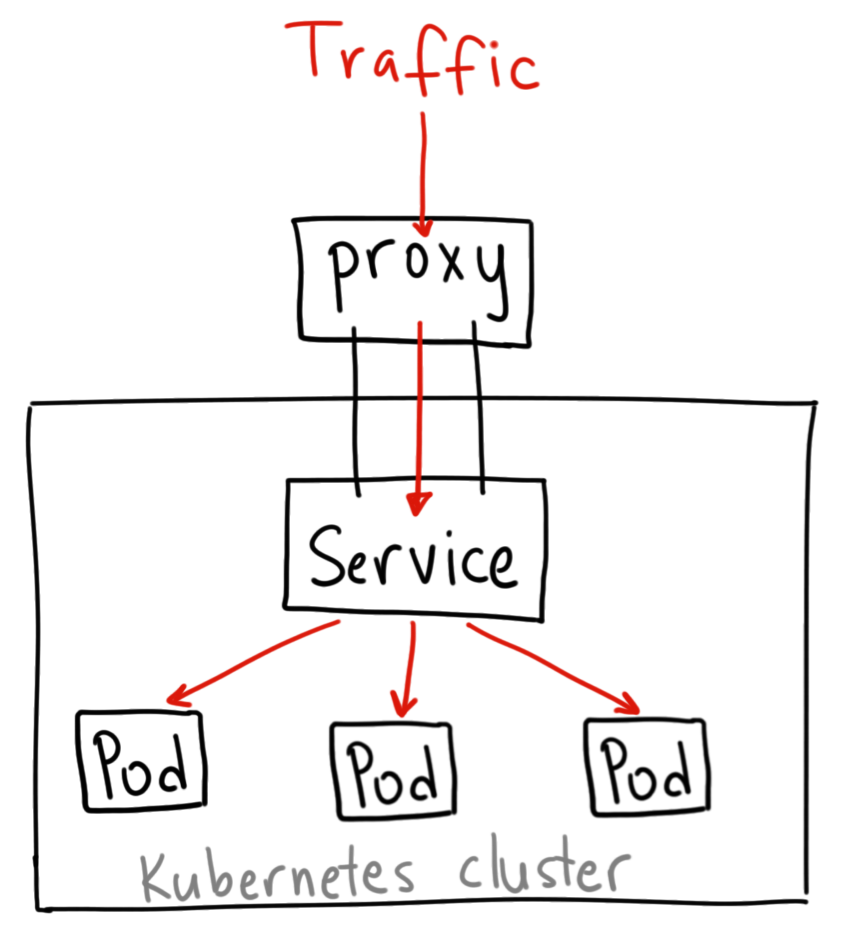
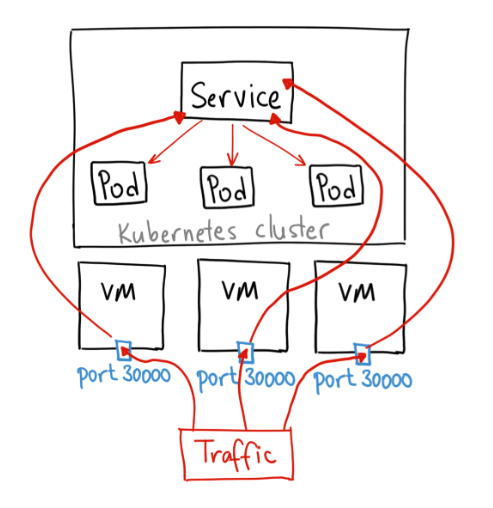
NodePort는 외부에서 노드 IP의 특정 포트(<NodeIP>:<NodePort>)로 들어오는 요청을 감지하여, 해당 포트와 연결된 파드로 트래픽을 전달하는 유형의 서비스다. 이때 클러스터 내부로 들어온 트래픽을 특정 파드로 연결하기 위한 ClusterIP 역시 자동으로 생성된다
NodePort의 개념 및 loadbalance
# 위의 기본 webui pod 3개 띄우는 deployment가 배포되어 있는 상태에서
# 서비스 실행
cat nodeport-nginx.yaml
apiVersion: v1
kind: Service
metadata:
  name: nodeport-service
spec:
  type: NodePort
  clusterIP: 10.100.100.200   #<--- 생략하면 랜덤ip가 됨
  selector:
    app: webui
  ports:
  - protocol: TCP
    port: 80
    targetPort: 80
    nodePort: 30200     #<-- 생략가능. 생략하면 랜덤포트 30000~32767 에서 정해짐

kubectl create -f nodeport-nginx.yaml

kubectl get svc
NAME               TYPE        CLUSTER-IP       EXTERNAL-IP   PORT(S)        AGE
kubernetes         ClusterIP   10.96.0.1        <none>        443/TCP        7d10h
nodeport-service   NodePort    10.100.100.200   <none>        80:30200/TCP   15s

#결과를 볼 수 있다.
curl 10.100.0.101:30200
curl 10.100.0.102:30200
LoadBalancer
AWS, Azure, GCP 등에서 운영가능하며, 자동으로 구성요청. NodePort를 예약 후 해당 nodeport로 외부 접근을 허용 외부 로드밸런서 장비로 세팅이 되게되며, 구성된 IP로 접근하면 각 NodePort로 분산 접근하는 효과